

 Pottery Date Night
 Bring All Your Friends Free Week
 Give a Month of Pottery
 Private Pottery Parties


 The Welcome Booklet
 Your First Ten Sessions
 The Pottery Process
 Finding the Studio
 Your Classes Never Expire
 The Four Tables
 Who’s Who
 The Rewards Program

 Flux Glazes
 The Calculators
 Kiln Tracker
 Holiday Kiln Deadlines


 Beginner’s Tool Set
 Fingernail Clippers
 Mayco Clay Mender
 Epoxy for Kintsugi
 Applicator Bottles
 Large Bead Rack

 Raku Workshop
 Nighttime Raku
 Horsehair and Feather Raku

 The Clay Hole T-Shirt
 Embroidered Crewneck
 Zip-Up Hoodie
 Pre-Made Bisqueware
 Glaze Catchers
 Kiln Cookies
 Clay Cubby Rental

 The Glaze Bible, Printed
 The Book of Molds, Printed
 Printable Pottery Guides
 Free Printable Trackers

 Gifts for Potters
 Christmas Pottery Ideas
 Mother’s Day Gift Ideas
 Pottery Date Night

 Studio Calendar
 2027 Studio Events
 What Should I Do Today?

 How to Throw on the Pottery Wheel
 How to Make a Pinch Pot
 How to Tap Center a Pot
 The Five Stages of Clay

 Is Pottery Hard to Learn?
 Pottery Wheel Practice Drills
 20 Easy Hand-Building Projects
 Everything That Sounds Wrong

 Why Did My Pottery Do That?
 Glaze Problems, Causes and Fixes
 How to Rescue Pottery at Any Stage
 Reglazing and Refiring


 A Beautiful Piece, Every Time
 Slab Roller Tips
 Any Dish as a Slump Mold
 Slab Roller & Slab Mold Certification

 The Beginner bundle
 The Intermediate bundle
 The Advanced bundle
 The Expert bundle
 The Insane bundle
 The Kiln furniture bundle

 The Pottery Skill Tree
 Clay & Pottery Calculators
 Logging Your Pottery and Glazes

 The Pottery Dictionary
 The Pottery Cone Chart
 Pottery Myths, Fact-Checked
 Is Handmade Pottery Food Safe?

 Incredible Ceramic Artist Videos
 How Dan Throws Giant Pots
 How to Dry Your Pottery
 The Pottery Wheel Introduction

 Pottery by Zodiac Sign
 Personality and the Pottery Wheel
 Pottery for Engineers
 ADHD, Hyperfocus, and Never Running Out
 Hobbies for Burnout
 Screen-Free Hobbies for Adults
 Every Addiction I Ever Had Lost to Art
 Functional Pottery Is Engineering

 How Do We Compare?
 Pottery Classes by City
 Every Pottery Studio in Utah
 Pottery in Draper

 Featured Members
 The Signature Wall
 Making Friends as an Adult Is Brutal
 The Clay Hole Commandments

 2027 Pottery Contests
 2027 Studio Parties
 Gallery Night


 Scream It Into the Void
 Destroy the Glaze Wall
 Daily Affirmation Cards
 Everything That Can Go Wrong

 Subscribe to Our Newsletters
 Contact The Clay Hole

 Corporate Team Building


 Glaze Combinations
 Glazes We Do Not Carry
 Making Glaze Test Tiles

 The Mega Glaze Tool
 How to Use the Mega Glaze Tool


 Glaze Brushing Techniques
 How to Use Underglaze
 How to Use Dipping Glazes

 The Dipping Glaze Guide


 Making a Glaze Catcher
 Fused or Sharp After Firing

 The Signature Wall
 My Viral Videos
 My Own Ceramics
 Meet Mud
How to Use a Pottery Bevel Cutter for Clean Mitered Corners
A bevel cutter is a tight wire held at a fixed angle, and it does one job beautifully: it cuts a clean, even slope along the edge of a clay slab, so two walls meet right on the corner instead of one butting into the side of the other. Here is how the tool works, which face goes down, what the numbers on it mean, and how it turns the hatched edges on our paper templates into crisp, mitered corners.
Butt the tool flat against a straight, square edge, lay the slab outside face down, and pull it toward you in one steady pass. The wire takes a wedge off the top face, so the outside keeps its full size and two walls meet right on the corner.

Jump to a section
A tight wire, a fixed angle, a corner that hides its seam
When two slab walls meet square on, one wall’s end shows on the side of the other. Cut both edges at an angle and they meet along the diagonal instead, so the seam sits exactly on the corner and every wall stays its full outside size. That angled edge is a bevel, and two bevels meeting make a mitered corner.
A bevel cutter makes that angle the same all the way along. Its foot slides on the table, its leg rides flat against the edge, and its wire runs from above the clay down to the table. A wire held like that can only take a wedge off the top face, which is why the outside face of the piece always goes down.
A square box wants 45 degrees on every corner. Other shapes want other angles, and our paper templates print the angle beside every edge that needs one. We keep bevel cutters at the studio for members to use.
What a bevel cutter is
Bevel cutter, beveler, beveling tool, bevel tool, wire bevel, angle cutter, miter cutter. Seven names, one idea: hold a cutting edge at a fixed angle and drag it along a slab.
- The common one is a wire on a small body. A block or a flat plastic shape holds a thin steel wire pulled tight at a set angle. The body slides on the table, butted against the slab’s edge, and the wire slices the edge as it passes.
- Most come in 30, 45 and 60 degrees. One tool may carry two or three wires, or a single wire that cuts a different angle depending on which side of the tool sits on the table. Commercial wire bevelers are generally limited to those three angles.
- Each angle is fixed. That is the whole point of the tool. A knife held by hand drifts over a long edge; a wire on a rigid body holds the same angle every time, on every edge.
- A knife and a ruler do the same job by hand. Slower, and the angle wanders unless you guard it, but they reach any angle at all, including the in-between ones a fixed tool cannot cut.
- Adjustable guides exist too. A guide that holds a needle tool at a choice of angles lets you bevel strips and shapes in one pass. Worth knowing about if you build a lot of many-sided forms.
- It is not only for corners. A bevel softens the edge of a tile or a tray rim, lets the two ends of a cylinder overlap neatly, and tidies the edge of a lid.
At the studio
We keep bevel cutters at the studio for members to use, so there is nothing to buy before your first mitered box.
Why bevel a corner at all
Two good ways to join slab walls, and a beveled corner wins on three counts. A butt joint is still a fine joint, and choosing one is a matter of taste.
The drawing shows one corner of a box from above, cut straight through: a butt joint on the left, a mitered corner on the right.

- The seam shows on the side. In a butt joint the end of one wall shows on the outside face of the other, a wall’s thickness back from the corner.
- The seam sits on the corner. Two bevels meet along the diagonal, so the line lands exactly where a corner is expected to be.
- A wider face to join. The sloped face is longer than the slab is thick, about 1.4 times as long at 45 degrees, so there is more clay to score and slip.
- The outside faces meet clean. Texture, stamping or a carved line runs right up to the corner and around it, with nothing to smooth over.
- A thin coil inside. Either joint gets one, pressed into the inside corner and blended into both walls. It is the strength of the corner.
There is one more difference, and it matters when you cut. With butt joints, two opposite walls run the full outside length and the two between them are shorter by two slab thicknesses. With beveled corners every wall is cut to the outside size, and the bevel takes its clay from the inside face. Our lesson on turning a paper pattern into a three-dimensional pot works through both sets of numbers.
How to cut a bevel
Six steps, and most of the work is in the first three. A bevel is only as straight as the edge it follows.
Six steps. Get the first three right and the cut takes care of itself.
- Let the slab reach leather hard. Firm enough to hold a crisp edge, still soft enough to bend a little. Soft clay drags and tears under the wire; dry clay crumbles and will not join well.
- Cut the edge straight and square first. Run a needle tool or knife straight down along a ruler or the template’s edge. The bevel cutter follows whatever edge it is given, wobbles included.
- Lay the piece outside face down. The wire only takes clay off the face that is up, so the face you want to keep full size goes on the table. If that face is textured, let it firm up before you turn it, so the table does not flatten it.
- Butt the tool flat against the edge. The foot on the table, the leg pressed flush against the square edge, the wire reaching over the clay. Light pressure on top with your fingertips; your other hand steadies the slab well back from the edge.
- Pull it toward you in one steady pass. Keep the tool square to the edge and keep going to the end. Stopping halfway leaves a step in the bevel. The strip of clay peels off behind the wire.
- Check it on a scrap before the real pieces. Bevel two scraps, stand them together, and look at the outside of the corner. A box corner should close square with no gap. Then cut every edge the piece needs at the same angle.

- Light pressure on top. Fingertips on the bar, just enough to keep the foot on the table. Pressing hard tips the tool off square.
- Wire pulled tight. A slack wire bows as it drags through the clay and cuts a curved face instead of a flat one.
- Butted flat against the edge. The leg rides the square edge the whole way. A gap here and the angle changes as you go.
- The cut runs down to the canvas. The wire comes out at the bottom of the edge, so the face on the table keeps its full length.
Check the cut by measuring it
After a 45 degree bevel, the face that was up is exactly one slab thickness shorter than the face on the table. On a 1/4 in slab that is 1/4 in. A smaller difference means the cut is too steep; a bigger one, too shallow.
What the numbers on your tool mean
Every bevel has two names, and they always add up to 90. Which one your tool uses decides whether your six-sided vase closes.

- 30 degrees from upright. Measured from a line standing straight up from the table. A steep cut is a small number this way.
- 60 degrees from the table. The same cut measured from the table instead. A steep cut is a big number this way.
- One cut, two names. Nothing about the clay changes. Only the line you measure from does, and the two numbers always add up to 90.
- The inside face comes up short. The wedge comes off the face that was up, which becomes the inside of the pot.
- The outside face keeps its full length. The face on the table is untouched, which is why it goes down.
At 45 degrees the two names are the same number, so a square box never trips anyone. The trouble starts at 30 and 60. Our paper templates count from upright: a template edge marked 30 wants a cut 30 degrees off straight up. If your tool counts from the table, that same cut is its 60 setting.
Find out which way your tool counts
Cut one scrap at the tool’s 30 setting and look at it end on. If the cut stands nearly upright, the tool counts from upright, the same way our templates do. If it lies long and shallow, it counts from the table, and every 30 on a template means its 60.
The angle for any shape
For straight walls with equal sides, divide 180 by the number of sides. That is the cut, measured from upright.
| Shape | Corner inside the pot | Cut from upright | Cut from the table | Inside face comes up short by |
|---|---|---|---|---|
| Triangle, 3 sides | 60 degrees | 60 | 30 | about 1¾ slab thicknesses |
| Square or rectangle, 4 sides | 90 degrees | 45 | 45 | exactly 1 slab thickness |
| Pentagon, 5 sides | 108 degrees | 36 | 54 | about ¾ of a thickness |
| Hexagon, 6 sides | 120 degrees | 30 | 60 | a little over ½ a thickness |
| Octagon, 8 sides | 135 degrees | 22½ | 67½ | about 4/10 of a thickness |
Why it works
Going all the way round a pot turns the wall through 360 degrees. Each corner takes its share, and the two edges meeting at that corner split it between them. Divide that 360 among the corners, halve it, and you have 180 divided by the number of sides.
A 30, 45 and 60 tool covers three shapes
Triangles, squares and hexagons, whichever way the tool counts. A pentagon at 36 or an octagon at 22½ falls between the settings, so those are knife work against a guide.
Tapered walls change the angle
When the walls lean in or flare out, the corner angle shifts and the arithmetic gets harder. Our templates for tapered forms have done that work and print the angle on the edge, and the printed number wins over this table.
Bevel cutters and our paper templates
Our paper templates are where a bevel cutter earns its place in your kit. Every edge that needs a bevel is already marked, and the angle is worked out for you.
Each template prints its pieces at exact size with the shrinkage already worked in. A hatched edge means bevel it. The outline is the outside face of the piece, and on a box or a vase every bevel comes off the inside, so the outside keeps the template’s size. Bevel the wrong face and the piece comes out small. The origami packs also mark a few edges OUT, which lean the other way; the pack names the direction on every edge, and its paper bevel gauge shows the lean.

- A hatched edge means bevel. The template marks only the edges that need one; the rest stay square.
- Nick it before you turn it. Once the paper is off and the piece is turned over, you cannot see which edge was hatched. A tiny nick in that edge with the needle tool tells you.
- Turn it outside face down. The paper sat on the outside face. Turned over like the page of a book, that face is on the table and the nicked edge has moved to the other side.
- Bevel only that edge. One pass with the bevel cutter at the template’s angle, and the piece is ready to join.
- Read the angle beside the hatching. Our templates count it from upright. If your tool counts from the table, use 90 minus the printed number. A box corner is 45 either way.
- Cut every piece square with the paper on. Straight down, just outside the paper’s edge, the way every template starts.
- Nick the hatched edges, then turn each piece over. Outside face down, nick on the edge to cut. An edge marked OUT is the one exception: bevel it with the outside face still up.
- Bevel the nicked edges with the tool. For an angle your tool does not have, a knife held against a card wedge cut to that angle does the same job, tested on a scrap first.
A few to start with: The Hexagon Bud Vase, six tapered panels with mitered corners; The Spire Tower Birdhouse, an eight-sided tower with the knife angle printed on every edge; and The Origami Fox, thirty-four flat facets with every edge marked with its angle, and a paper gauge for the angles in the pack. Current members download our templates free.
No bevel cutter: a knife and a ruler
The hand method reaches every angle a fixed tool cannot, and it works the other way up.
- The outside face stays up. A knife comes in from above, so it can lean whichever way you tilt it. Cut along the outline and lean the blade in under the piece, toward the inside face. The top face keeps its full size and the wedge comes off underneath.
- A ruler keeps the line straight. Lay it along the edge and run the side of the blade against it. A straight line matters more than the exact angle on the first try.
- A card wedge keeps the angle. Cut a small triangle of card to the angle you want, stand it against the ruler, and keep the blade against its slope all the way along.
- One long stroke beats several short ones. Every restart leaves a step in the face, and a stepped face leaves a gap on the outside of the corner.
- A thin blade drags less. A craft blade or a thin fettling knife slices leather hard clay cleanly; a thick blade pushes it and rolls the edge.
- Test on a scrap, same as the tool. Two scraps cut at the angle, stood together, tell you more than a protractor.
Tool or knife, one rule
The outside face keeps its full size and the wedge comes off the inside. A bevel cutter does that with the outside face down; a knife does it with the outside face up, leaning in. Mix the two up and the bevel lands on the wrong face.
Joining a beveled corner
A bevel only hides the seam. The joining is what holds it together through drying and the kiln.
- Join pieces at the same stiffness. Two walls that dry at different rates pull a seam apart. Cut and bevel them from the same slab, at the same time, and keep them covered until you build.
- Score both sloped faces deeply. Real scratches across the whole face, on both pieces. The wider face a bevel gives you only helps if all of it is scored.
- Brush on slip and press the faces together. Line up the sharp outside points first, then press along the seam until slip squeezes out.
- Compress the outside with a rib. Run it along the corner to close the seam and keep the edge crisp.
- Add a thin coil to the inside corner. Press it in and blend it into both walls. The strip the bevel cutter took off is the right size for this; roll it a little rounder and use it.
Mind the sharp edge
A beveled edge ends in a thin, sharp point along the outside face. Pick the pieces up by their flat faces, never by that edge, or it chips before it ever reaches the corner.
What goes wrong, and what it means
A gap on the outside of the corner
The angle was off. Most often a tool that counts from the table read as one that counts from upright, or the tool tipped off square partway along. Bevel two scraps at the same setting and check before cutting again.
The bevel tore or dragged
The clay was too soft. The wire pushes soft clay ahead of it instead of slicing it. Let the pieces firm up to leather hard and cut again.
The edge crumbled
Too dry. Leather hard clay cuts cleanly; drier clay breaks, and a dry seam joins badly. Cut sooner next time, and never scrape or cut bone dry clay, which makes silica dust.
The sloped face is wavy
A slack wire bowing through the clay, an edge that was not straight to begin with, or a pass that stopped and started. Tighten or replace the wire, cut the edge square along a ruler, and pull in one go.
The piece came out small
The bevel came off the outside face. The template outline is the outside, so that face has to stay full size: outside face down for the tool, outside face up for a knife.
The sharp point broke off
Handled by the edge, or let dry too far before joining. Small chips fill with slip and the inside coil; a long missing stretch is a new piece.
Three mistakes worth skipping
The wrong face up
A bevel cutter shortens the face that is up. Put the outside face down, or the piece comes out small and the corners gap.
Clay too soft or too dry
Soft clay tears under the wire and dry clay crumbles. Leather hard is the window: firm enough to hold an edge, soft enough to bend a little.
Reading the number the wrong way
Our templates count angles from upright. If your tool counts from the table, a template’s 30 is your tool’s 60. One scrap cut first settles which way it counts.
The ones that come up at the tables
Is a beveler the same thing as a bevel cutter?
Yes. Beveler, bevel cutter, beveling tool, bevel tool, wire bevel, angle cutter and miter cutter all name a tool that holds a cutting edge at a fixed angle along a slab’s edge. Most are a wire on a small body; a few hold a needle tool instead.
Do I have to bevel every corner?
No. A butt joint, scored, slipped and coiled, is a strong joint and quicker to make. Bevel when you want the seam on the corner, a texture that runs unbroken round it, or when a template’s hatching asks for it. Both are good pottery.
What angle do I need for a square box?
45 degrees on both edges of every corner. It is the one angle that is the same number whichever way a tool counts, which makes a box the right first project for a new bevel cutter.
Why did my hexagon not close?
Usually the tool counts from the table and the cut was read from upright, or the other way round, so every edge came out at 60 instead of 30. Six small errors add up to a gap. If the walls taper, the angle also shifts away from 30, and a template’s printed angle is the one to use.
Can I bevel the seam of a cylinder?
Yes, and it makes a neat overlapping seam. Bevel both ends, sloping opposite ways, so one end’s slope lies on the other’s. With a bevel cutter that means one end cut outside face down and the other cut outside face up.
Can a bevel cutter follow a curved edge?
A gentle curve, yes: keep the leg against the edge and turn the tool as you go so it stays square across it. Tight curves are easier with a knife, held at the angle against the edge.
My slab is thicker than the tool reaches. What now?
The wire has to come out at the table, so a slab thicker than the tool can reach will not bevel cleanly. Use a knife and a ruler for that piece, or roll the next slab to the thickness the template calls for.
How do I look after one?
Wipe the wire clean after each use and let it dry. A wire that has gone slack or kinked cuts a curved face, so tighten it if the tool allows, or replace it. Our lesson on taking care of your pottery tools covers the rest of the kit.
Where to go next
Pottery Paper Templates
Every pattern we have drawn, from a first mug to an eight-sided tower, with the bevels already marked.
See them →Turning a Paper Pattern into a Three-Dimensional Pot
Drawing your own pattern, with the numbers for butt joints and beveled corners worked through.
Read it →Leather Hard Clay: Soft, Hard and What Each Is For
How to tell when a slab is ready to bevel, and when it has gone too far.
Read it →Lidded Boxes and Treasure Boxes
A box from paper templates, with beveled corners as one of the ways to build it.
Read it →Slab Roller Tips: Thickness, Stretch and Shape
An even slab is the start of an even bevel.
Read it →Taking Care of Your Pottery Tools
Keeping wires, blades and ribs clean and working.
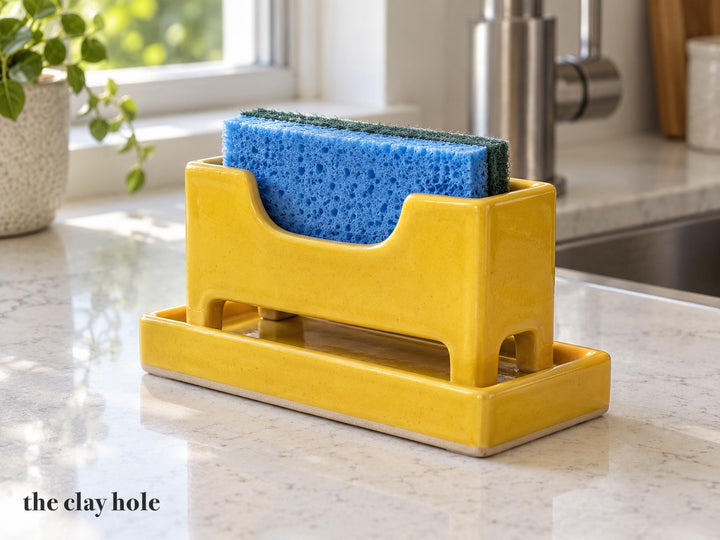
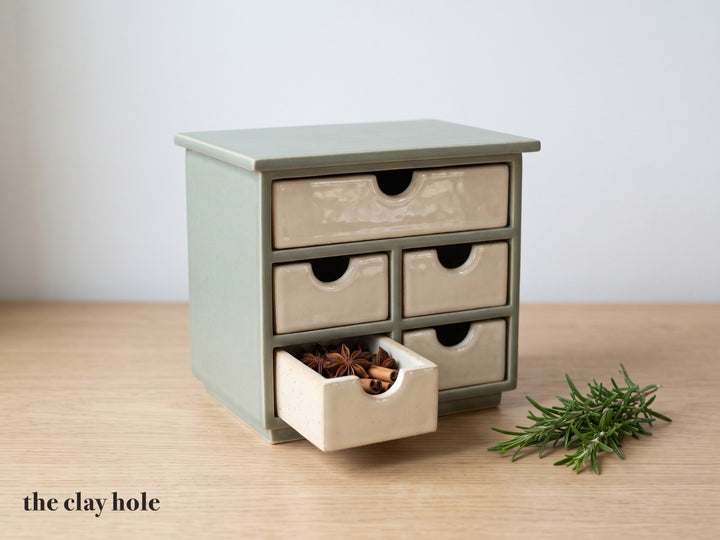
Read it →Mitered corners from a sponge caddy to a chest of five drawers, with every bevel angle printed on the edge.
Printable patterns drawn at exact size, with a 1 inch check square on every sheet. All one hundred two, free for members logged in to a Clay Hole account, $4 to $40 each for everyone else.
 Paper template 73
The Sponge Caddy and Drip TrayAn upright sponge caddy on four corner legs with a U dip for your fingers, standing in its own drip tray.caddy 5 3/16 in x 1 15/16 in, 2 13/16 in tall, in a 5 13/16 in x 2 9/16 in tray$5.50, free for membersOpen
 Paper template 86
The Pressed Leaf Obelisk VaseA tall square tapered vase with real leaves pressed into all four walls.about 25 oz to the brim, 8 1/2 in tall, 3 3/4 in square at the base$8, free for membersOpen
 Paper template 80
The Spice Drawer ChestA small chest of five sliding drawers for whole spices, with a top that overhangs and a plinth set back underneath.6 1/4 in tall, 7 1/16 in wide at the top, 5 in deep$20, free for membersOpen
The corner is the whole point
A bevel cutter is about the simplest tool on the table: a wire, a body and an angle that never changes. What it buys you is a corner that reads as a corner, crisp on the outside, strong on the inside, with nothing to smooth over and nowhere for a texture to break.
Cut a box first, at 45 degrees, where the numbers cannot trip you. Then pick a template with a few hatched edges, read the angle, check it on a scrap, and build something with six or eight corners. Come and make one at the studio; the bevel cutters are waiting.
Leather hard clay, a straight square edge, outside face down, the tool butted flat, one steady pull. Check the angle on a scrap, and remember our templates count it from upright.
If you want the full picture, what the numbers on your tool mean, the angle for any shape, the knife method and how to join the corner, switch to the Comprehensive Version at the top of the page.
Which version would you like to print?
Videos come out as a labeled box with the title and channel to search for, since paper does not play them.