

 Pottery Date Night
 Bring All Your Friends Free Week
 Give a Month of Pottery
 Private Pottery Parties

 The Welcome Booklet
 Your First Ten Sessions
 The Pottery Process
 Finding the Studio
 Your Classes Never Expire
 The Four Tables
 Who’s Who
 The Rewards Program
 Flux Glazes
 The Calculators
 Kiln Tracker
 Holiday Kiln Deadlines

 Beginner’s Tool Set
 Fingernail Clippers
 Mayco Clay Mender
 Epoxy for Kintsugi
 Applicator Bottles
 Large Bead Rack
 Raku Workshop
 Nighttime Raku
 Horsehair and Feather Raku
 The Clay Hole T-Shirt
 Embroidered Crewneck
 Zip-Up Hoodie
 Pre-Made Bisqueware
 Glaze Catchers
 Kiln Cookies
 Clay Cubby Rental
 The Glaze Bible, Printed
 The Book of Molds, Printed
 Printable Pottery Guides
 Free Printable Trackers
 Gifts for Potters
 Christmas Pottery Ideas
 Mother’s Day Gift Ideas
 Pottery Date Night
 Studio Calendar
 2027 Studio Events
 What Should I Do Today?
 How to Throw on the Pottery Wheel
 How to Make a Pinch Pot
 How to Tap Center a Pot
 The Five Stages of Clay
 Is Pottery Hard to Learn?
 Pottery Wheel Practice Drills
 20 Easy Hand-Building Projects
 Everything That Sounds Wrong

 A Beautiful Piece, Every Time
 Slab Roller Tips
 Any Dish as a Slump Mold
 Slab Roller & Slab Mold Certification
 The Pottery Skill Tree
 Clay & Pottery Calculators
 Logging Your Pottery and Glazes
 The Pottery Dictionary
 Why Did My Pottery Do That?
 The Pottery Cone Chart
 Pottery Myths, Fact-Checked
 Is Handmade Pottery Food Safe?
 Incredible Ceramic Artist Videos
 How Dan Throws Giant Pots
 How to Dry Your Pottery
 The Pottery Wheel Introduction
 Pottery by Zodiac Sign
 Personality and the Pottery Wheel
 Pottery for Engineers
 ADHD, Hyperfocus, and Never Running Out
 Hobbies for Burnout
 Screen-Free Hobbies for Adults
 Every Addiction I Ever Had Lost to Art
 Functional Pottery Is Engineering
 How Do We Compare?
 Pottery Classes by City
 Every Pottery Studio in Utah
 Pottery in Draper
 Featured Members
 The Signature Wall
 Making Friends as an Adult Is Brutal
 The Clay Hole Commandments
 2027 Pottery Contests
 2027 Studio Parties
 Gallery Night

 Scream It Into the Void
 Destroy the Glaze Wall
 Daily Affirmation Cards
 Everything That Can Go Wrong
 Subscribe to Our Newsletters
 Contact The Clay Hole
 Corporate Team Building

 Glaze Combinations
 Glazes We Do Not Carry
 Making Glaze Test Tiles
 The Mega Glaze Tool
 How to Use the Mega Glaze Tool

 Glaze Brushing Techniques
 How to Use Underglaze
 How to Use Dipping Glazes
 Glaze Problems, Causes and Fixes
 The Dipping Glaze Guide

 Making a Glaze Catcher
 Fused or Sharp After Firing
 The Signature Wall
 His Viral Videos
 His Own Ceramics
 Meet Mud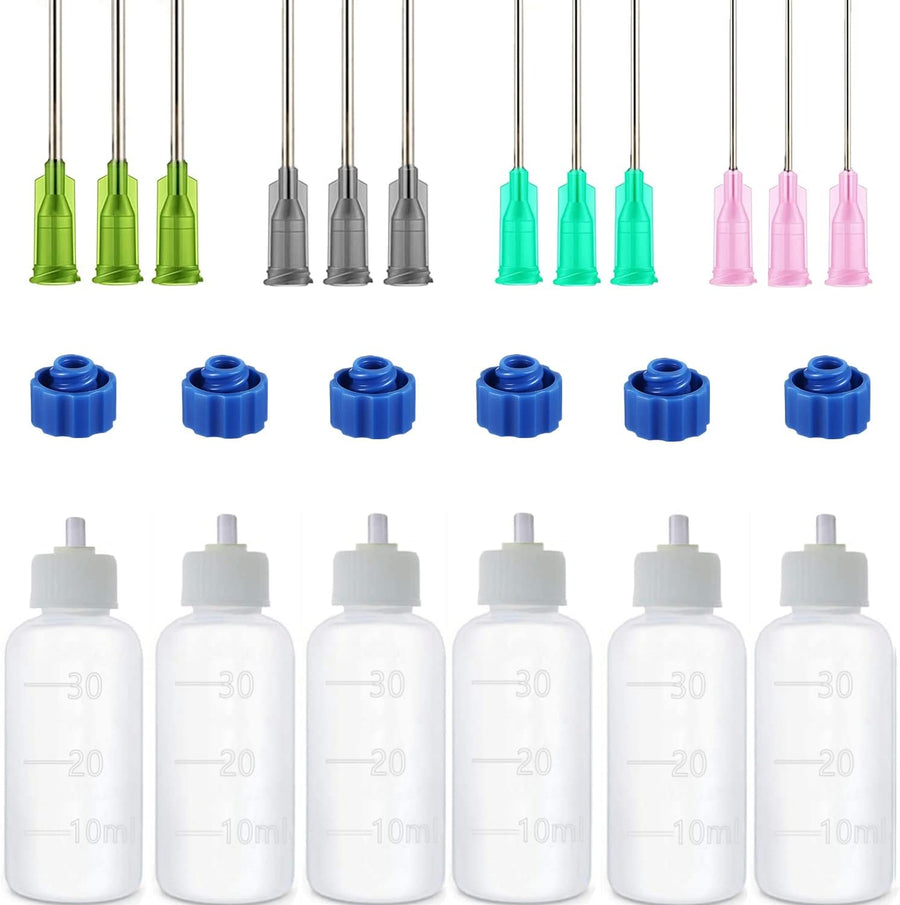
PRECISE GLAZE APPLICATION
6-Pack Applicator Bottles
We tested more than a dozen brands looking for a bottle that lays a clean line without clogging, spitting, or dribbling down its own side. This set won, and it was not close.
Six 30 ml bottles, twelve blunt luer-lock needle tips in four gauges, and six sealing caps. Once you buy a pack it is yours to keep, rinse and reuse forever.
In-studio purchase only. We do not ship any of this. If you are not a member standing in the building, this one is not for you.
Which tip for which glaze
One rule covers most of it. Thick glaze wants a fat tip. Thin glaze wants a fine one. The tips are color coded so you can grab the right one without holding it up to the light.
14 gauge, green
The widest opening. Stroke & Coat and anything else with the body of yogurt. This is the tip that saves you when a glaze keeps stalling halfway down the needle.
16 gauge, gray
The everyday one. Most brush-on glazes and thicker underglaze go through it happily, and the line is still narrow enough to look deliberate.
18 gauge, teal
Thinner underglaze, detail work, outlines and lettering. Start here when you are writing words on a mug and go finer only if you have to.
20 gauge, pink
The finest. For glazes that pour more like water than like paint. Running Hot Chowder comes out barely thicker than water and this is the tip it needs.
HOW THEY GO TOGETHER
The tips are luer lock. Push the needle onto the cap and give it a quarter turn until it snugs. Needles are one inch long. If glaze is leaking around the collar, you did not turn it.
Keeping them alive
A 20 gauge needle with dried glaze in it is not a needle any more. Five habits and these will outlast the membership.
-
1
Only fill what you will use
Squeeze the leftovers back into the glaze bottle before you rinse. Glaze that dries in an applicator is glaze nobody gets to use.
-
2
Rinse right away
Warm water in through the bottle and out through the needle until it runs clear. Right away, not after you clean up everything else.
-
3
Check the needle
Fill it with water and squeeze. If it does not squirt straight, something is in there. Soak it before it sets.
-
4
Cap them
The six blue caps seal the threads, which is what stops a half-used bottle turning into a solid brick in your bag.
-
5
Squeeze from the bottom
Roll the bottle up from the base instead of choking it in the middle. Steadier pressure, steadier line, fewer blobs at the start.
Worth knowing
- In-studio purchase only. We do not ship any of this. If you are not a member standing in the building, this one is not for you.
- No refunds.
- The bottles are yours. The glaze is not. Fill only what your project needs and pour the rest back into the studio bottle before you rinse.
- Six bottles at 30 ml each. Twelve blunt tips, three each of 14, 16, 18 and 20 gauge. Six sealing caps. Needles are one inch long and thread on with a luer lock.
- Rinse by hand and let them air dry standing up.
- Every glaze flows differently through the same tip. Test on a scrap or a tile before you commit to the good side of the pot.
- The needles are blunt, not sharp, but they are still steel tubes. Keep the caps on them around kids.
Grab a pack, keep it in your bag, and stop borrowing somebody else's.