Pottery Date Night
 Bring All Your Friends Free Week
 Give a Month of Pottery
 Private Pottery Parties

 The Welcome Booklet
 Your First Ten Sessions
 The Pottery Process
 Finding the Studio
 Your Classes Never Expire
 The Four Tables
 Who’s Who
 The Rewards Program
 Flux Glazes
 The Calculators
 Kiln Tracker
 Holiday Kiln Deadlines

 Beginner’s Tool Set
 Fingernail Clippers
 Mayco Clay Mender
 Epoxy for Kintsugi
 Applicator Bottles
 Large Bead Rack
 Raku Workshop
 Nighttime Raku
 Horsehair and Feather Raku
 The Clay Hole T-Shirt
 Embroidered Crewneck
 Zip-Up Hoodie
 Pre-Made Bisqueware
 Glaze Catchers
 Kiln Cookies
 Clay Cubby Rental
 The Glaze Bible, Printed
 The Book of Molds, Printed
 Printable Pottery Guides
 Free Printable Trackers
 Gifts for Potters
 Christmas Pottery Ideas
 Mother’s Day Gift Ideas
 Pottery Date Night
 Studio Calendar
 2027 Studio Events
 What Should I Do Today?
 How to Throw on the Pottery Wheel
 How to Make a Pinch Pot
 How to Tap Center a Pot
 The Five Stages of Clay
 Is Pottery Hard to Learn?
 Pottery Wheel Practice Drills
 20 Easy Hand-Building Projects
 Everything That Sounds Wrong

 A Beautiful Piece, Every Time
 Slab Roller Tips
 Any Dish as a Slump Mold
 Slab Roller & Slab Mold Certification
 The Pottery Skill Tree
 Clay & Pottery Calculators
 Logging Your Pottery and Glazes
 The Pottery Dictionary
 Why Did My Pottery Do That?
 The Pottery Cone Chart
 Pottery Myths, Fact-Checked
 Is Handmade Pottery Food Safe?
 Incredible Ceramic Artist Videos
 How Dan Throws Giant Pots
 How to Dry Your Pottery
 The Pottery Wheel Introduction
 Pottery by Zodiac Sign
 Personality and the Pottery Wheel
 Pottery for Engineers
 ADHD, Hyperfocus, and Never Running Out
 Hobbies for Burnout
 Screen-Free Hobbies for Adults
 Every Addiction I Ever Had Lost to Art
 Functional Pottery Is Engineering
 How Do We Compare?
 Pottery Classes by City
 Every Pottery Studio in Utah
 Pottery in Draper
 Featured Members
 The Signature Wall
 Making Friends as an Adult Is Brutal
 The Clay Hole Commandments
 2027 Pottery Contests
 2027 Studio Parties
 Gallery Night

 Scream It Into the Void
 Destroy the Glaze Wall
 Daily Affirmation Cards
 Everything That Can Go Wrong
 Subscribe to Our Newsletters
 Contact The Clay Hole
 Corporate Team Building

 Glaze Combinations
 Glazes We Do Not Carry
 Making Glaze Test Tiles
 The Mega Glaze Tool
 How to Use the Mega Glaze Tool

 Glaze Brushing Techniques
 How to Use Underglaze
 How to Use Dipping Glazes
 Glaze Problems, Causes and Fixes
 The Dipping Glaze Guide

 Making a Glaze Catcher
 Fused or Sharp After Firing
 The Signature Wall
 His Viral Videos
 His Own Ceramics
 Meet Mud
Hand-building · Surface decoration
Sprig molds, and how to make a sprig stay on
A sprig is a small piece of clay, shaped in a sprig mold and stuck onto a pot. Shaping it takes about four seconds. Getting it to still be there after two firings is the part nobody warns you about, and that is most of what this page covers.
Sprig molds live in the studio and they are open to every Level. No color sticker, no certification, no sign-up. Walk over, take one, press some clay into it.
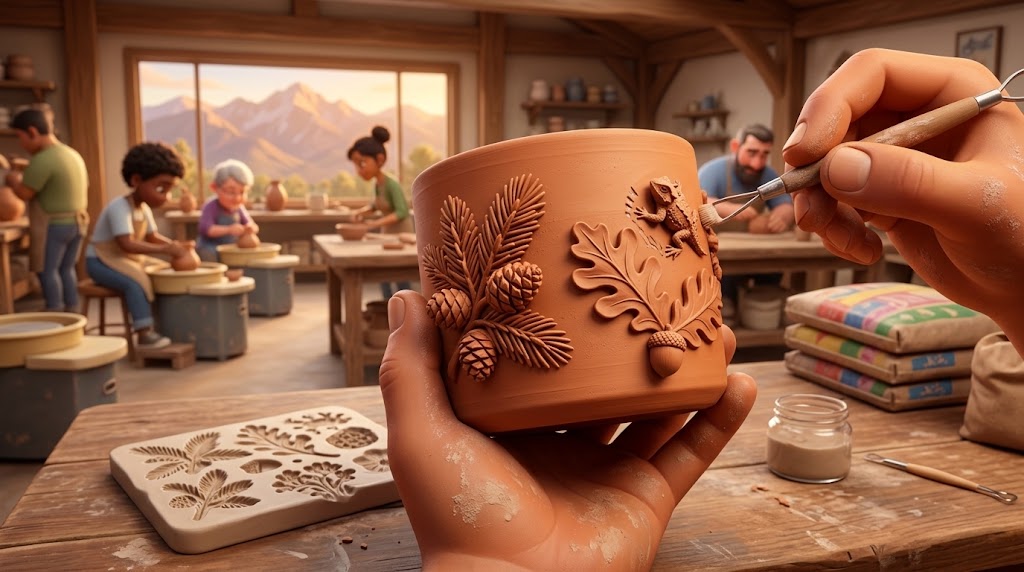
The sprig mold is the flat carved slab on the left. Everything raised on the pot came out of it. The tool work happening there is step six, compressing the edges down so nothing can lift.
The sprig mold is the flat carved slab on the left. Everything raised on the pot came out of it. A small tool is compressing an edge down into the wall, which is the move that decides whether any of it is still there after the kiln.
The whole thing, in one idea
A sprig and the pot have to shrink as one piece of clay
A sprig is a small clay decoration, pressed in a sprig mold and stuck onto a pot. From the second it goes on, the two of them have to dry, shrink and fire as though they had always been one thing. Nearly every way this goes wrong is that one sentence being broken somewhere.
So the sprig is the same clay body as the pot, because different bodies shrink by different amounts. It is as wet as the pot or a touch wetter, never drier. Its back is scraped flat and thin, because a thick sprig has far more shrinking to do than the thin wall it is stuck to. It goes down center first and rolls outward, because a sealed pocket under the sprig never joins, and the damp trapped in it turns to steam in the firing and pushes the sprig off from behind. And every edge is compressed down until a fingernail cannot catch it, because a lifted edge is a crack that has already started.
Five things. Get them right and the sprig is still there in three weeks. Get one of them wrong and you find out in a kiln, with the piece already glazed.
Attach to leather-hard or soft clay. Nothing else.
Leather-hard is the sweet spot, and it is where most sprigging happens. Soft clay straight off the wheel bonds even more willingly, as long as you are gentle enough not to push the wall out of shape. Bone-dry clay has finished shrinking while your wet sprig has not started, so the join tears itself open. And a bisque fired piece takes nothing but glaze.
Do it in this order
Press it, attach it, and the things that ruin it
Hold this up at your table. Work down the first list, then the second, and stay off the third.
- ✓Same clay body as the pot
- ✓Soft clay, softer than the pot
- ✓Overfill the sprig mold, press from the center outward
- ✓Scrape the back dead flat and thin
- ✓Wait, then tap it out. No tools
- ✓Press a spare, keep the batch under plastic
- ✓Pot leather-hard or soft, never bone-dry or bisque
- ✓Sprig as wet as the pot, or wetter
- ✓Choose the spot before you score
- ✓Score both surfaces, then slip both
- ✓Center down first, then roll outward
- ✓Compress every edge, all the way round
- ✓Damp brush to clean, then stop. Fingernail test it
- ✗Mix a different clay body
- ✗Slap it on flat
- ✗Score only one side
- ✗Clean up with a wet sponge
- ✗Dry it fast or under a lamp
- ✗Pile glaze on the relief
- ✗Mix or pour plaster in the studio
Why this page is built the way it is
Reading it and watching it are two different jobs
A video is unbeatable for hands. Text is unbeatable for everything else. So every technique below is written out in full, and beside each one sits a video from somebody who does that exact technique beautifully.
Read the section, watch the video, then go do it. Or watch first and read after. Both work. Doing only one of them is the version that leaves you standing at a table wondering why your sprig fell off.
The longer answer, if you want it
Almost every pottery technique on the internet exists as a video and nothing else. Which is strange, because a video is genuinely bad at some of the things you need while you are actually working.
What it is unbeatable at is hands. You cannot write down what it looks like when somebody’s thumb presses clay into the corner of a sprig mold. You have to see it. Angle, speed, pressure, how hard they push, how gently they peel. Watch it once and your hands know something your brain could not have been told.
What it is bad at is everything else. You cannot skim a video. You cannot jump straight to step six. You cannot re-read the one sentence you needed without dragging a scrub bar around with clay on your finger, or search it three weeks later when you have forgotten which way round the scoring goes. A page you can hold up on your phone at your table, paused forever, while both of your hands stay busy.
There is a decent pile of research behind that, and it lands roughly where any potter would guess: people remember more from words and pictures together than from either one on its own, and they remember more when they control the pace than when a video controls it for them. That is the whole theory. Watch the hands, read the reasons, and the thing sticks.
None of these videos are ours. Every one is somebody else’s work, credited by name and channel, and clicking play sends you to their video on their channel. Nothing from YouTube loads on this page until you press play.
Section one
What a sprig actually is
A raised decoration, made separately from the pot and stuck on. That is the entire idea, and it is about two thousand years old.
You press soft clay into a small sprig mold with a shape cut into it. The clay picks up that shape. You pop it out, you get a little clay medallion with a raised design on the front and a flat back, and you stick it onto the side of a pot. That piece is the sprig. The thing you pressed it in is the sprig mold. Doing it is called sprigging.
If you have ever seen the pale blue Wedgwood pottery with the white figures standing off the surface, you have seen sprigging. Same technique, several hundred years and a great deal more patience.
It is one of the fastest ways there is to make a plain pot look like it took a lot longer than it did. A thrown cylinder with six sprigs around the shoulder reads as a serious piece. That same cylinder without them reads as a cup.
Three things a sprig mold is not
It is not slip casting. Slip casting pours liquid clay into a hollow mold to make the whole object. We do not do that here, we have never done it, and we are not going to. Every time the word mold comes up in a pottery studio somebody assumes slip casting, so it is worth saying out loud.
It is not a slab mold. Slab molds are the big forms in the slab mold room that you drape a whole rolled slab over to make a bowl or a platter. Those are level-tiered by a colored sticker and they need a certification first. Sprig molds are small, they make a decoration rather than a form, and they need neither.
It is not a stamp. A stamp pushes a shape into the wall of your pot and leaves a dent. A sprig adds clay on top and leaves a bump. Related idea, opposite direction, and the two get mixed up constantly.
Section two
Six kinds of sprig mold, and which ones you can have here
The mold is just a hard thing with a shape in it. What it is made of changes how it releases, how much detail it holds, and whether you are allowed to make it in the building.
Our sprig molds
The studio’s own sprig molds are open to every Level. Green Level Members get the same access as Black Level Members. Take one, use it, clean it with a dry cloth, put it back exactly where it came from.
Bisque clay molds
Press or carve a shape into a pad of clay, dry it, bisque fire it, and you have a sprig mold. This is the one to learn. Bisque firings are free, it costs you a scrap of clay, and porous bisque releases clay beautifully.
Silicone molds
Flexible, so they let go of shapes that a rigid mold would grip forever. You can also press a silicone mold straight onto the curved wall of a pot, which skips the whole releasing step. Bring your own.
3D printed molds
The best route for lettering, logos and anything geometric. Print the negative, bring it in, press into it. Printed plastic is not porous, so plan on a release trick and a slightly firmer clay than you would use in bisque.
Store-bought molds
Perfectly welcome. There are hundreds of them out there in resin, plastic and bisque, most of them a few dollars. Bring whatever you like and use it at your table.
Plaster molds
The traditional material, and the one with a rule attached. A finished, cured, fully dry plaster sprig mold from home is welcome here. Making one is not something that happens in this building. See below, because this one actually matters.
We do not mix or pour plaster in the studio. Not ever, not in a corner, not in a cup.
This is the same rule that stops anyone cutting down into a slab mold with a needle tool, and it exists for the same reason. A few specks of plaster worked into a lump of clay will sit there invisibly through wedging, throwing, drying and the bisque firing. Then the firing bakes the water out of that speck of plaster, and afterward it takes moisture back out of the air, swells, and pops a crater out of the side of the pot. Not in the kiln: weeks later, on a pot that was finished. Sometimes it is your pot. Often it is somebody else’s pot, three weeks later, made from clay that was recycled out of the same bin.
Wet plaster in a room full of clay, water buckets, tools and shared tables is a contamination event waiting for a date. So plaster mold making happens at your house, on your table, with your own tools, and the finished dry mold comes in with you. Nobody has ever objected to that arrangement.
Bisque clay molds do everything a plaster sprig mold does, release just as well, cost almost nothing, and can be fired here for free. That is why we point everyone at bisque instead.
Section three
Make your own bisque sprig mold
Seven steps, one scrap of clay, and a free bisque firing. This is the cheapest custom tool in pottery and you can make your first one in about ten minutes.
-
1
Find a shape with no undercuts
An undercut is any place where the shape widens again below its surface, like the head of a mushroom or the curl of a leaf tip. Clay presses in there happily and then refuses to come back out without tearing. Run a finger over your object and ask whether it could lift straight up out of soft clay. If yes, it will work.
Good first objects: a real leaf with strong veins, a coin, a button, a piece of carved wood, a shell, lace, a bit of textured hardware, a seed pod, the sole of a small toy shoe.
-
2
Roll a fat pad of clay
Half an inch thick at the very least, and wider than your object by an inch or so all the way around. Any of our clay bodies works. Do not go thin. A thin mold warps as it dries and cracks in the kiln, and you find that out after you have already carved the good one.
-
3
Press the object in once, straight down
Once. Straight down, firm, even pressure across the whole thing, and then lift straight up. Rock it while it is in there and you get a double image that no amount of cleaning up will fix.
If the object is fighting you, dust it with a little cornstarch first. Deeper is better than shallow, up to about a quarter inch, because a shallow impression makes a flat, sad sprig.
-
4
Tidy the edges and sign it
Trim the pad into a shape your hand likes holding, round the outside edges so they do not chip, and scratch your name on the back with a needle tool. Sprig molds get put down and picked up by other people constantly. A named mold comes home.
-
5
Dry it slowly and completely
Thick, solid clay with an uneven surface is exactly the shape that likes to crack while drying. Put it on your shelf under plastic for a few days, then uncovered for a few more. Slower than you think. It has to be bone dry before it goes in a kiln.
-
6
Bisque fire it
Onto the bisque shelf like anything else. Bisque firings are free, every time, and they run to cone 05. It comes back hard, pale and slightly porous, and that porosity is the whole trick: the dry bisque pulls a hair of water out of the back of your clay and the sprig lets go on its own.
One thing to expect. Clay shrinks on its way through a kiln, so your finished mold comes out a little smaller than the object you pressed. Nobody notices on a decoration. It only matters if you are trying to match an exact size.
-
7
Test press it before you trust it
Press one sprig, release it, look at it. If detail is missing, your impression was too shallow. If it will not release, you have an undercut and it is easier to make a second mold than to fight the first one forever. Molds are cheap. Evenings are not.
Section four
Pressing a clean sprig
Four seconds of work with about five ways to do it wrong. Every one of them shows up later as a blurry sprig or a sprig with a hole in the back of it.
-
1
Use the same clay body as the pot
This is the one rule on this page that has no exceptions. Every clay body shrinks by its own amount on the way through a kiln. Stick a B-Mix sprig on a Berlin Gray pot and the two of them spend the whole firing pulling against each other. The sprig cracks, or the pot cracks under it, or the sprig simply lets go and lands in the kiln.
If you want the sprig to be a different color, do that with underglaze after it is attached, not with a different bag of clay.
-
2
Start softer than your pot
Fresh clay from the bag, worked in your hands until it is warm and pliable. Soft clay flows into fine detail. Firm clay bridges over it and gives you a sprig that looks like a rough draft of the sprig mold.
-
3
Overfill, then press from the center outward
Put in more clay than the cavity needs. Press with your thumb starting at the middle and working out toward the edges, so the air has somewhere to go. Get into every corner and every deep spot. Air that gets trapped in the middle becomes a hollow in the back of your sprig, and a hollow becomes a crack.
-
4
Scrape the back dead flat
Drag a rib or a straight edge across the back of the mold to shear off everything standing proud. A flat back is what sits down properly against a pot wall. A domed back rocks, and a sprig that rocks has a gap under one side of it.
Take the back down until the sprig is thin. Thin sprigs survive firings. Fat ones are the ones that pop off.
-
5
Let it release itself
Do not go at it with a needle tool. Wait thirty seconds or a minute. A bisque or plaster mold pulls a little water out of the clay and the sprig loosens on its own, then it drops out with one firm tap onto your palm. Silicone you simply flex. Printed plastic usually wants a dusting of cornstarch first, or a mold that is bone dry.
If it is still gripping, put the whole mold down and go do something else for two minutes. Patience releases sprigs. Tools tear them.
-
6
If you press a batch, keep them under plastic
Sprigs are small and thin and they dry at a frightening speed on an open table. A sprig that has stiffened while it waited for you will not attach properly to anything. Press six, cover five, work on one.
The single best habit here
Press a spare. Every time. They cost nothing, they take four seconds, and the moment you tear one while releasing it you will be very glad the replacement is already sitting under plastic instead of needing to be pressed while your pot dries out on the table.
Section five · The important one
Attaching it so it is still there in three weeks
Nearly every sprig that fails, fails here. Not in the sprig mold, not in the kiln. At the moment it went onto the pot.
Attach to leather-hard or soft clay. Nothing else.
Leather-hard is the sweet spot, and it is where most sprigging happens: firm enough to hold its shape while you press against the wall, wet enough to still bond. Soft clay fresh off the wheel works too, and it bonds even more willingly, though you have to be gentle enough not to push the wall out of shape.
Not bone-dry. Bone-dry clay has finished all its drying shrinkage. Your fresh wet sprig has not even started. It will shrink against a surface that cannot move with it, and it will either crack itself apart or crack the pot underneath it. And not bisque. A bisqued pot has been fired. Nothing sticks to it anymore except glaze.
-
1
Match the moisture, or come in slightly wetter
The sprig should be as wet as the pot, or a touch wetter. Never drier. Two pieces of clay at the same moisture shrink together as one thing. A dry sprig on a damp pot shrinks less than what it is stuck to, and the join tears itself open while you sleep.
If your sprigs have been sitting out and gone stiff, press fresh ones. Do not try to revive them with water.
-
2
Decide exactly where it goes first
Hold the sprig against the pot, look at it, move it, look again. Once it touches scored wet clay it is committed. Peeling a sprig back off a scored surface leaves a scarred patch you will spend ten minutes hiding.
If you are placing several, mark the positions lightly with a pencil or a pin first so they end up evenly spaced instead of nearly evenly spaced.
-
3
Score both surfaces
Crosshatch the spot on the pot with a needle tool, and crosshatch the back of the sprig. Both sides, properly, right out to the edges. Scoring only one side is the most common shortcut in this entire technique and it roughly halves the strength of the join.
Score a slightly larger patch than the sprig, so no scored area is left showing around the outside. Scratch marks you can see are scratch marks the glaze will find.
-
4
Slip both sides
Slip is your own clay mixed with water to about the thickness of yogurt. Same body, same bag. A fingertip or a soft brush is plenty on each side. A dry seam is a seam that opens in the kiln.
Mayco Clay Mender from the front desk is a repair product, not a replacement for your own slip, so ask a staff member before using it on a piece going into our firings. Applicator bottles keep slip where you want it rather than everywhere.
-
5
Press from the center outward, never flat
Touch the middle of the sprig down first, then roll and press outward toward the edges so the air is pushed out ahead of your fingers. Slap it down flat and you seal a pocket of air under the middle of it. Across that pocket the sprig is not joined to the pot at all, and a sealed pocket holds damp long after the surface feels dry, so it is steam off that trapped water that lifts the sprig in the bisque, sometimes taking a chip of the wall with it.
On a curved wall, work the sprig gently to the curve as you go rather than forcing a flat sprig onto a round pot.
-
6
Compress every edge, all the way around
This is the step that decides it. Take a small wooden tool or the tip of a finger and work right around the outside of the sprig, pressing the edge down into the pot wall until you cannot get a fingernail under any part of it.
A lifted edge is not a cosmetic problem. It is a crack that has already started and is just waiting for the kiln to finish it.
-
7
Clean up with a damp brush, not a wet sponge
Squeeze-out around the edges is normal and it is easy to remove. A soft brush, barely damp, run around the outside. A wet sponge floods the join, softens everything you just compressed, and drags slip across the face of your sprig.
Then stop touching it. The detail you are still fussing with is the detail you are about to erase.
A quick way to check your work
Once it is on and cleaned up, run a fingernail gently around the entire outside edge of the sprig. If it catches anywhere at all, that spot is not attached. Go back, add a little slip under it, and compress it again. Ten seconds now, or a broken piece later.
Section six
Drying, glazing and firing a sprigged piece
The sprig is on and the piece looks great. There are three more places it can go wrong, and all three are easy to avoid once somebody tells you they exist.
Dry it slower than you would dry a plain pot
A sprigged pot is a thin wall with a thick lump stuck to it, and the two dry at different speeds. The wall gets there first and starts shrinking while the sprig is still wet and still full size. That difference is what opens a hairline around the edge.
So cover it, and take your time. Green Level and Yellow Level Members use plastic sheets, and Purple Level and Black Level Members can use a cotton sheet, which dries more evenly. Either way, slow. A sprigged piece is one of the better arguments for just leaving it a week.
Keep it away from the heat lamps entirely if you can. Fast drying is what a sprigged piece likes least.
Glaze thin over the relief
Glaze pools in every recess, and a sprig is nothing but recesses. Three heavy coats will fill in your detail until you are left with a vague bump where a design used to be. Two thinner coats over the sprigged area keeps the shadows that make the relief read.
Our Flux glazes move a great deal at cone 5½, and movement is the enemy of fine relief. On a bold, chunky sprig a running glaze breaking over the high points can look spectacular. On a delicate one it is an eraser. Worth a test tile before you commit a piece you care about.
The other direction is underglaze, which is the cheapest way to make a sprig pop. Brush it over the sprigged area at leather hard, then wipe the high points back with a barely damp sponge. Color stays in the low spots, the raised detail comes back clean, and the whole design jumps forward. Underglaze goes on leather-hard or bone-dry raw clay only, and the piece bisque fires before any glaze touches it.
Two firing notes
Bisque is free and runs to cone 05, same as always. Glaze firing is five cents per cubic inch, and anything 125 cubic inches or smaller is the flat $4.80. It runs to cone 5½. Every piece that gets glaze sits on a kiln cookie, and staff load every kiln.
The one that catches people: firing cost is measured at the widest points, and a sprig can be what makes your pot wider. A mug with sprigs standing off both sides measures wider than the same mug plain. A sprig costs nothing extra while the piece still fits inside the flat charge. If it is already close to the 125 cubic inch line, a sprig can push it over, and that surprises people who measured before they decorated.
When it goes wrong
Three failures, and what actually caused each one
These three cover most of what happens to a first sprig, and the cause is almost never the one people guess.
Section seven
When it goes wrong, and what actually caused it
Six failures cover almost everything. Each one has a single most likely cause, and it is almost never the one people guess.
The sprig came off in the bisque firing
An air pocket under the middle of it, nearly every time. It was pressed on flat instead of from the center outward, so across that pocket the sprig was never joined to the pot at all, and the damp sealed in there turned to steam in the firing and pushed what was left from behind.
Next time: center first, roll outward, and compress the edges last.
A hairline crack has opened around the edge
A moisture mismatch, or drying too fast. The sprig went on drier than the pot, or the two of them dried at different speeds afterward and pulled apart along the join.
Next time: press fresh sprigs, attach them wet, cover the finished piece and dry it slowly.
The sprig sticks in the sprig mold
Usually an undercut in the shape, sometimes clay that is too wet, sometimes a mold that has absorbed water from the last four sprigs and stopped being thirsty.
Next time: dust with cornstarch, let the mold dry out between sessions, and give it a minute before you tap it out.
The detail came out mushy
Clay that was too firm to flow into the fine parts, or an impression that was too shallow to begin with, or squeeze-out from over-pressing when it went on the pot.
Next time: softer clay, deeper mold, and stop touching the face of the sprig once it is down.
The sprig itself cracked
Too thick. A fat sprig has far more shrinking to do than the thin wall it is stuck to, so it tears itself rather than moving with the pot.
Next time: scrape the back further down. Thin sprigs survive. Thick ones argue with the pot and lose.
The glaze swallowed the whole design
Too many coats, or a glaze that moves a lot at cone 5½. Glaze pools in exactly the low spots that were giving your sprig its shadows.
Next time: two thinner coats over the relief, and save the heavy movers for bolder sprigs.
Section eight
The short version, for your phone
Everything above, compressed to what you actually need in front of you while your hands are busy. Leave this open at your table.
- ✓Same clay body as the pot
- ✓Soft clay, softer than the pot
- ✓Overfill the sprig mold
- ✓Press from the center outward
- ✓Scrape the back dead flat and thin
- ✓Wait, then tap it out. No tools
- ✓Press a spare
- ✓Keep the batch under plastic
- ✓Pot is leather-hard or soft
- ✓Sprig as wet as the pot, or wetter
- ✓Choose the spot before you score
- ✓Score both surfaces, not one
- ✓Slip both, yogurt thickness
- ✓Center down first, roll outward
- ✓Compress every edge, all the way round
- ✓Damp brush to clean, then stop
- ✓Fingernail test the whole edge
- ✗Mix a different clay body
- ✗Attach to bone-dry or bisque
- ✗Slap it on flat
- ✗Score only one side
- ✗Clean up with a wet sponge
- ✗Leave any edge you can lift
- ✗Dry it fast or under a lamp
- ✗Pile glaze on the relief
- ✗Mix or pour plaster in the studio
Questions we get
Sprigging questions, answered straight
Do I need to be certified to use the sprig molds?
No. No certification, no color sticker, no sign-up. Every Level has full access to the sprig molds. That is different from the slab rollers and slab molds, which do require a certification first, so it is worth being clear that the two are not connected.
Can I bring my own sprig molds from home?
Yes. Silicone, 3D printed, store-bought resin, or a finished plaster mold you made at your own house. All welcome. The only thing that does not happen here is the mixing and pouring of plaster.
Why is plaster such a big deal if the slab molds are made of it?
Because those are cured blocks that live on a shelf, and the danger is not plaster sitting still. It is loose plaster: wet plaster splashing, dry plaster dust, a chip flaked off with a needle tool. Any of that finding its way into a clay bin will eventually blow a crater in somebody’s pot, weeks after that pot came out of the kiln. It is the same reason nobody cuts down into a slab mold with a sharp tool.
Can I put a sprig on a piece that has already been bisque fired?
No. Raw clay bonds to raw clay. Once a piece has been through a bisque firing, the only thing that will stick to it is glaze. If you have a bisqued piece you wish you had decorated, the moment has passed, and the next one gets sprigged before it dries.
Can I use a different color clay for the sprig, like Wedgwood does?
We would not recommend trying it with two different bags of our clay. Different clay bodies shrink by different amounts, and that difference is what pulls a sprig off a pot in the kiln. The reliable way to get contrast is to attach a sprig in the same body and then color it with underglaze on raw clay before the bisque firing. Same look, none of the risk.
How big can a sprig be?
Small and thin is safer than large and thick, and the reason is always shrinkage. A big sprig has more shrinking to do, and every extra millimeter of thickness is more disagreement between the sprig and the wall it is stuck to. If you want a large decorated area, several smaller sprigs arranged together behave far better than one big one.
Can I sprig the inside of a bowl?
You can, and it looks lovely, with one thing to think about first. Glaze pools deeper in the bottom of a bowl than anywhere else on a piece, so relief down there is the most likely to disappear under it. Sprigs on the inside walls survive much better than sprigs on the inside floor.
Is there someone who can just show me?
Yes. Any hand-building instructor will walk you through a sprig from mold to attached in about five minutes. Our main instructors wear pink shirts and our trade instructors wear purple, and there are instructors on the floor during every instructed class.
One last one, all the way through
Or watch somebody do the whole thing
Making the sprig mold, pressing the sprig, attaching it to the pot, in one sitting. Its chapters run from making the mold to attaching the sprig and finishing, the same path as sections three to five of this page, and it stops there: drying, glazing and firing are left out. Follow along with either, or run both at once.
Making the sprig mold, pressing the sprig, attaching it to the pot, in one sitting. It runs longer than everything above it put together, and it is worth it if you want to watch the hands do the parts a list cannot describe.
How to use slab molds
The other kind of mold in the building, and the twelve-step walk-along that goes with it.
More videos worth your time
Twenty-four hand-picked lessons from fifteen of the best potters on YouTube. None of them ours.
How to use underglaze
The wipe-back trick that makes a sprig pop, plus the studio rules for using underglaze on raw clay.
That is the nutshell. The Comprehensive Version at the top of the page adds the reason behind every rule, the six kinds of sprig mold and which ones are allowed in the building, the seven steps for making your own, a full section on drying and glazing a sprigged piece, and seven more videos.
Every video on this page belongs to the person who made it. Titles and channel names are theirs. Nothing loads from YouTube until you press play, and pressing play opens their video on their channel.
Which version would you like to print?
Videos come out as a labeled box with the title and channel to search for, since paper does not play them.